The first thing you're going to need to do is get a bicycle. How much is a bike? Well, how long is a piece of string? It depends. You can pay almost any sum of money for a bike from "free from a buddy" to well over ten grand. Seriously, there are bikes that have electronic shifting. ELECTRONIC SHIFTING!!! Do your research and be honest with yourself about what you really need and what you can afford in a bike.
My first bike was a Trek 2.1 and it was about $1200 from my LBS (Local Bike Store). You'll need to learn to start "talking tri" if you want to be one of the cool kids. Before you know it you'll be telling people you're "hoping to PR your next 'A' race as long as you don't bonk." I'm currently riding a full carbon fiber Quintana Roo CD0.1 and I love it, but to be perfectly honest, the bike is SO much better than me. I almost feel bad for it. Think about strapping a sumo wrestler onto a race horse and going against 85 pound jockeys. But hey, triathlon's my biggest vice so I bought a really nice bike.

(still riding those same wheels after 4 Ironman races and 5000km)
My Trek 2.1 was just an aluminum road bike that I clipped some aero bars on and it got me through around a dozen races from sprint right up to Ironman. There was nothing fancy about this bike but it took me a long long way and, in fact, I sold it to my friend and he did his first Ironman on it.
I've done considerable reading on bikes because that's just what you do when you get into triathlon. You buy triathlon magazines, you get on triathlon boards (my personal favourite is www.beginnertriathlete.com ) you join a local tri club to train, and you wear spandex clothing in socially-inappropriate settings. You'll start reading about "buying speed" by upgrading the components on your bike. READ THE ACTUAL NUMBERS!!!
The "free speed" they are talking about applies mostly to the athletes that have already maxed out their technique, conditioning and strength and now the only way for them to go any faster is to buy a carbon fiber water bottle cage that is 30 grams lighter than the plastic or aluminum option and only about 10 times the price. 30 grams. Do you know how little 30 grams is? To give you an idea, 1 Liter (34 Fl Oz) of water weighs 1000 grams so the $80 water bottle cage you are thinking about buying will save you 1 ounce of weight. Just pour out one quick 'glug' of water and you'll get the same effect. All kidding aside I'm almost certain you will not notice this weight difference on even a 6-7 hour Ironman distance ride. Save your money when you're starting out, you'll need it to pay for your race fees.
There are purchases you can make for your bike that are going to be worth it and most of them will fall into 1 of 2 categories. The first is making your bike more comfortable and the second is upgrading any parts that move. Every single person NEEDS to get a bike fit done by a professional. You can change nothing else on your bike other than the angles and distances and have a completely different experience. Once you get this done, start looking at a saddle (it's called a saddle, not a seat, fancy hey?) and pedals. An ill-fitting saddle can absolutely ruin your day... and your undercarriage. I personally favor the ISM Adamo because it allows me to ride essentially pain free, what more can you ask for? Most LBS's will let you demo a saddle for a week at a time. Take them up on this! No matter how much your buddy likes his or her saddle, if you don't have the same spacing between your "sit bones" (ischial tuberosities to us anatomy nerds) then the saddle won't be good for you. Along with a saddle you will likely want to pick up some chamois (pronounced: SHA-mee) cream. This cream goes on your skin where you will generate friction while cycling. Yup! Right down your shorts! Nothing better pre-ride than watching a bunch of people fiddling around down there while carrying on a casual conversation. My favorite is DZ Nuts, although the menthol is a shock the first time you use it. Good wake-up call for early morning rides however.
 |
| DZ Nuts chamois cream |
 |
| ISM Adamo Saddle (Perfect for my dimensions) |
The next worthwhile investment is part of both categories. Pedals have moving parts AND can give you more comfort. I've always ridden Shimano SPD ultegras . This is something else you'll learn very quickly. Within each brand there is a wide range of products and the prices are very much reflected in the quality of product. Just because they're brand name doesn't mean they're going to have all the best parts. Cheap pedals are probably not the best idea because they can fail, and when they do it can be really inconvenient. Also, the bearings that allow for smooth rotation of the pedal are not the best quality and you can be fighting your equipment for speed.
 |
| Shimano Ultegra pedal. |
These pedals are called 'clipless' pedals. This has always confused me because everyone tells you to 'unclip' when you get to a red light. But they're clipless? I've stopped asking what's up with the name because I've never gotten a satisfactory answer. However, once you get these pedals you're going to need cycling shoes. These shoes can range from around $100 to VERY EXPENSIVE. The two biggest things you need to look for in bike shoes are:
1) Fit: A good fit will be snug but not too tight. You don't want any play in the shoe or you can develop a blister and lose power in your pedal stroke. But, you don't want them too tight because your feet will swell a bit during a ride and if they're tight to begin with it can get problematic. It's worth investing in a good pair of shoes because they last. My current shoes have taken me well over 5000km (3000ish miles) and are still going strong. Smelling strong too!
 |
| Asked my wife for a pic of my shoes. This is what I got. Kinda weird with the flowers but you can see they're doing alright for that many miles on them. |
2) Hole Pattern: The hole pattern in your shoes will be a major factor in your purchase. Each pedal comes with a matching 'cleat' that snaps into the pedal. This cleat will have one of a few patterns to choose from and they must match your pedal.
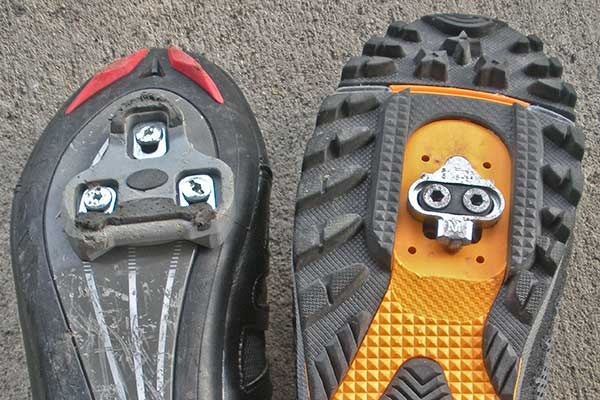 |
| Road and Mountain Bike Cleats |
It is certainly acceptable to use runners and 'cages' on your bike but if you're going to be serious about the sport you'll need cycling-specific equipment. Cycling shoes are designed to apply pressure to your pedals in all positions of the pedal stroke and to lose as little energy as possible to slack material. In runners, you'll have more play and lose some of your power to the stretchy fabric of the shoes. Over a long ride this can add up to quite a bit of lost speed.
 |
| Pedals with 'cages' |
Once you get your shoes and pedals figured out you're going to want to practice getting in and out of your pedals. It takes some practice to get the pressure and alignment right and I would recommend sitting on your bike braced against a wall or door frame so you don't end up laying on the ground stuck to your bike yelling for help from a passerby or neighbour. On the pedal there is a screw that will adjust how hard or easy it will be to get your cleat in and out of the pedal. Get on the bike, clip in and out a few times and see if it takes a reasonable amout of effort to get out. If it's too easy, tighten it up, too hard, loosen it.
NOTE: When you buy your pedals you need to know what shoes you'll be using them with. Different pedals have different hole patterns that the shoes need to match so take your shoes with you to the LBS.
Once you've gotten some practice and are happy with the pressure required to get in and out of the pedal give it a try on your front street. Practice getting out of your pedals while riding up to a light and getting a foot down.
Falling: It's probably going to happen once or twice and it's extremely embarassing. My personal favourite was at a red light in downtown traffic. I pulled up to the light, unclipped my right foot and while I was waiting for the light to turn I shifted my balance too far to the left and didn't have time to get my left foot out. To the traffic sitting behind me, the spandex-wrapped large gentleman in front of them was just standing there and then fell over. I jumped back up, took a bow, and rode off . I wasn't hurt and I attribute that to my football playing. You need to learn how to fall. DO NOT stick out an arm to break your fall. Too often you'll break a wrist or arm this way. Instead, train yourself to tuck and roll. Tuck your arm into your side and just let it happen. It's counter-intuitive but much much safer.
 |
| 2 days before my first Ironman I went for a quick ride to check my shifting and put it into the gravel. Real smart. |
After this I would invest in a good wheel set if you can afford it. Wheels are another of the 'moving parts' category and will have a noticable impact on your speed. There are two different types of wheels. Clinchers and tubulars. Clinchers consist of two pieces; an inner tube with a tire that gets hooked under the rim of the wheel. Tubulars are one piece and are adhered to the wheel with special tape. There are advantages to both types of tire and I would talk to my LBS to decide what's right for you. Wheels can cost you as much as some bicycles so don't be too hasty with a purchase. Do your research, and especially check the weight restrictions on every wheel set you're considering. At 270 pounds I've put over 5000 km (3000 miles) on my Mavic Cosmic Carbone SL's and I haven't done a thing to them. There are other wheel sets that promise to go much faster (not really that much faster) but have a weight restriction of 185 pounds. I would always pick durability over speed personally, I can't be dealing with multiple wheel sets. If you can afford it, more power to you.
ETIQUETTE:
Depending on the city in which you live there may be more or less tolerance for cyclists. Edmonton, AB is making strides towards becoming cyclist-friendly but in a place where there's only about four months of riding, five if we're really lucky, it's hard for both cyclists and drivers to figure out how to get along. Drivers, please give us some room to move. If there's a rock or a pothole we may need to suddenly veer left or right without warning and if you only give us a few inches of space it can become a bad crash in a hurry.
Cyclists, I would have to say that we are our own worst enemy. The way some of us ride is just embarrassing. My biggest pet peeve are the guys that ride up past the line of cars that are waiting at a red light. My experience is that most drivers will give you a good berth when they pass you the first time. After that, every time they have to pass you the room gets a little less each time. If you want respect on the road act accordingly. Wait your turn in traffic and drivers will really appreciate it. Secondly, if you're riding on the road, don't use the sidewalk just because it suits you and then jump back onto the street. Follow the rules of the road. At stop signs, don't just blow through. First off it's dangerous and illegal, and secondly it just makes all of us look bad.
Group riding is a different animal unto itself. The biggest thing you need to think about in cycling in a group is communication. Tell people when you're passing so they don't bump you into traffic and you don't spook them. Always always always pass on the left. We always leave a rider's right side open so if they need to move over for pot holes or other debris they know they can move right without having to check.
We also communicate potential hazards on the road. Loose gravel, ejected water bottles, chunks of metal and other hazards can ruin a ride very quickly. To tell people behind you that there is a problem you just point at ground on the side of the your bike that the hazard is located. This is very appreciated by your fellow riders and an excellent practice to get in to. There are other signals you will use but start with this, it's the biggest one
 |
| Rider signalling a hazard ahead and to the left |
When you start riding outdoors there are a few safety things to consider. Listening to music can be hazardous, it takes some of your attention away from the task of cycling safely. If you absolutely must have music you can get handlebar mounted music or just wear one ear bud in your right ear (left if you're in those weird places where you drive on the left). Carry $20 with you for an emergency; this is enough for some food or water, a lift if you have a catastrophic bike failure or the weather turns dangerous or a celebratory drink or two if things go really well. As with open water swimming, let someone know where you're going and how long you plan to be gone. Finally, a trackable cellphone is a nice touch in case you need to make a call. Also, my wife follows my progress on Find my iPhone and this eases her nervousness while I'm out on a long ride.
Like I said last week, we'll talk about a shopping list for your first trip to the tri shop.
This week for the bike there are a number of items you're going to need and a whole bunch you're going to want.
NEED:
-Extra inner-tubes or tubular tires depending on which wheel type you've gone with. ($5-$10 each)
-Tire levers. These plastic bars are used to remove and replace your tire when you flat. Ask for a demo! ($5)
-Allen-key set. Everything on your bike will be adjusted with Allen keys. ($5-$10)
-CO2 cartridges and a pump. In an emergency, like a road side flat, this will re-inflate your new tube. ($15 for a starter kit with a pump and 2 cartridges and then CO2 is about $4 per cartridge after that)
-Water bottle cages and water bottles. Some LBS's will include these but others will not. ($15 per cage and $5-$20 per bottle depending on how fancy schmancy you are)
-Bag to put all of this stuff in that attaches under your seat. OR you can use a waterbottle as a gear container but then you lose a water bottle space on your bike. Not recommended for hot climates or long rides. ($20-$100 depending on the options) X-Lab makes great stuff for this and I have the X wing on my bike.
 |
| This Super Wing from XLab has spots for your CO2 and pump, water bottles and a bag for tools and tubes underneath. It also puts these things behind the rider so it's more aerodynamic. |
-Helmet. A basic cycling helmet will do just fine and a helmet is REQUIRED for most if not all triathlons. I love my Giro because it is airy and comfortable and looks great!. Get fitted by a pro at the shop!
 |
| Giro cycling helmet |
Get the bike shop to show you how to change a flat. It's not something you want to try and figure out on the roadside. And use a CO2 cartridge just once to make sure your pump works and that you can operate it. It'll cost you $4 but it's well worth it.
WANT:
I'll only list a few things because you can buy so many cool things for your bike it'll make your head spin.
-Bike shorts. These shorts look like normal spandex shorts but have a very special feature. The chamois provides padding in all the tender areas where the saddle can cause pain. I prefer "bib shorts" instead of regular shorts because the shoulder straps keep the shorts pulled up and also don't allow a space between my shorts and jersey where you can get sunburned.
| Cycling Bib shorts |
 |
| Cycling short. You can see the chamois resting on the seat. |
-Bike Computer. This will have a speedometer, odometer and clock. This base model is all I have on my bike and it's served me just fine. ($50-$75)
-The next level up will usually include cadence meter (how quickly you're pedaling) and a heart rate monitor. (Around $125)
 |
| CATEYE Bike Computer |
-The highest level is getting into GPS computers. These tools are great for people that love to analyze everything. They'll tell you how far you go, what your heart rate was at different points of your training and even compare how you did on a particular section of road compared to other times you've ridden it, just by syncing it with your computer. ($150-$700)
 | |
| Garmin Edge 810 Bike Computer |
Note: I do not receive any compensation for endorsing any products (yet, fingers crossed). My opinions are based solely on my experience using the products in training and racing.
I see they kicked u out of the latri club site! Lol
ReplyDeleteThey kicked me out? Haha. Wonder what I did?
DeleteGood article though!
ReplyDeleteHey Colin great blog and you are fecking awesome. I just did an Olympic and I talk like I won the Tour De France with a piano tied to my arse. I use to work with your Uncle Bill in Yemen. Most people don't know this but Bill is a pretty funny guy. I don't think I have an Ironman in me but just starting a 12 week program for another Olympic.
ReplyDeleteSwim
Bike
Run
Die
Thanks Frank! Bill's hilarious, we love him! Ironman is so much more mental than physical. You can do it if you set your mind to it.
DeleteThis comment has been removed by a blog administrator.
ReplyDeleteHi Colin - article on equipment was very informative. Like it very much. I think I have similar rims to yours. Cosmic Carbone SLE. Did you ever have an issue with the IRONMAN officials over those wheels? I thought they did not like wheels with fairings.
ReplyDeleteI have been reading your posts regularly. I need to say that you are doing a fantastic job. Please keep up the great work.visit here....
ReplyDeleteBig Man, I can't find your vital statistics anywhere. Are the Cosmics your wheel advice for fellow Clydes? I'm 6'4" and 110kg.
ReplyDelete